

Struggling to clear Apocalyptic Shadow in 2026 on budget units? Learn the boss rotations, break thresholds, and speed tuning to claim full Stellar Jades.
Apocalyptic Shadow remains the sharpest skill check in Honkai: Star Rail. Unlike Memory of Chaos, which counts down full turn cycles, this mode runs on a dynamic Action Value (AV) meter. Every basic attack, skill, and boss phase shift consumes AV. Let that meter bleed out, and your score drops below the reward threshold.
Clearing Difficulty 4 does not demand limited five-stars with signature Light Cones. The mode functions as an elemental matching and Toughness puzzle. Respect the break windows, sync with stage buffs, and accessible four-stars and standard five-stars will clear full stars.
Action Value Mechanics: Why Speed Rules the Point Meter
Score tracking in Apocalyptic Shadow punishes sluggish rotations. In Memory of Chaos, a slow setup can still finish cleanly if the burst hits within the round. Here, every idle action costs points directly.
Each ally action pushes the turn order forward. Bosses and their summons take turns independently, burning away remaining AV. Spending cycles cycling buffs without stripping Toughness ruins your final tally. Raw damage without turn acceleration guarantees a failed run.
Your supports need 134 Speed minimum. This threshold gives them two full actions in the first AV bracket to battery energy, feed Skill Points, and apply debuffs before the boss triggers phase mechanics. A debuffer left at 115 Speed hands the boss free turns to stack crowd control on your team.

Honkai: Star Rail
8080 Oneiric Shard * 2
 8080 Oneiric Shard * 2USD 172.46Buy Now
8080 Oneiric Shard * 4
8080 Oneiric Shard * 4USD 344.92Buy Now8080 Oneiric Shard * 8
8080 Oneiric Shard * 8USD 689.83Buy NowExpress Supply Pass
 Express Supply PassUSD 4.31Buy Now
60 Oneiric Shard
60 Oneiric ShardUSD 0.86Buy Now300+30 Oneiric Shard
300+30 Oneiric ShardUSD 4.31Buy Now980+110 Oneiric Shard
980+110 Oneiric ShardUSD 12.93Buy Now1980+260 Oneiric Shard
1980+260 Oneiric ShardUSD 25.87Buy Now3280+600 Oneiric Shard
3280+600 Oneiric ShardUSD 43.11Buy Now6480+1600 Oneiric Shard
6480+1600 Oneiric ShardUSD 86.23Buy Now
Scoring Thresholds and the Starward Mode Split
Point targets shift depending on whether you run standard Difficulty 4 or take on Starward Mode.
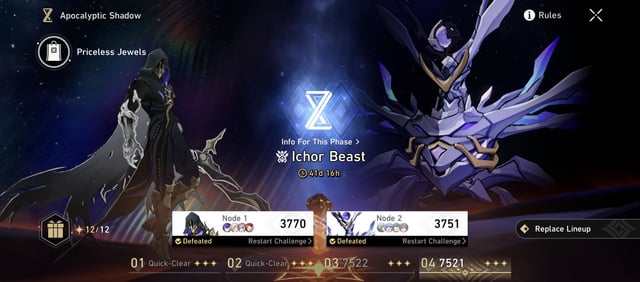
Standard Difficulty 4 requires two separate teams across two boss nodes. No character can be shared between sides. If your best sustain locks into Node 1, Node 2 goes without them. Bank 6,600 total points across these two nodes to take home the baseline 800 Stellar Jades.
Starward Mode demands a third squad. You field three separate teams to hit a 10,200-point threshold, earning an extra 100 Stellar Jades (900 total) and Jade Feathers.
| Challenge Mode | Node Requirement | Point Threshold | Primary Reward |
|---|---|---|---|
| Standard Difficulty 4 | 2 Non-Overlapping Teams | 6,600 Cumulative Points | 800 Stellar Jades |
| Starward Mode | 3 Non-Overlapping Teams | 10,200 Cumulative Points | 900 Stellar Jades + Jade Feathers |
| High-End Target | 2 or 3 Teams | 7,500+ / 11,000+ Points | Speedrun & Margin Buffer |
Targeting 6,600 points across two nodes remains the standard completion goal for non-premium rosters, while Starward Mode demands deeper horizontal roster investment.
If you lack the resources to raise multiple squads at once, picking up Oneiric Shards for character pulls gives you direct access to key resources and banner warps to flesh out your second and third teams.
Boss Toughness Mechanics: Breaking the 50% Damage Barrier
Bosses enter the arena with Steadfast Safeguard active. Until you deplete their Toughness bar to zero, they possess a passive 50% damage reduction.
Burying expensive Ultimates into unbroken Toughness wastes half your damage output. The mode requires a strict rotation: chip the Toughness bar down, then unload burst damage during the Vulnerability window.
Shattering that bar flips the fight in your favor immediately:
- The 50% damage reduction drops.
- The boss takes 100% increased damage while broken.
- Steadfast Safeguard clears all crowd control off your team.
- Ally Action Values advance for immediate follow-up turns.
- Your entire team receives an instant heal, removing the need for panic healing.
High-frequency Toughness breakers beat out pure hypercarries who cannot match the boss's elemental meter.

Matching Finality's Axiom: The Core Scoring Multiplier
Your stage buff selection matters more than relic sub-stats. Aligning your team with the right Finality's Axiom swings clear scores by over 1,000 points, while an off-synergy pick stalls damage pacing completely.
The Celestial Lupine cycle (August 31 – October 5, 2026) provides three distinct buffs:
| Axiom Buff Name | Ideal Playstyle | Core Combat Effect | Best Budget Units |
|---|---|---|---|
| Blighted to the Bone | Damage over Time (DoT) | Grants 1 Energy per DoT proc + 40% All-Type RES Ignore | Serval, Sampo, Guinaifen |
| Unto Apotheosis | Skill Point Hypercarry | +6% stacking CRIT DMG per Skill Point spent (max 10 stacks) | Dan Heng, Qingque, Asta |
| Land of Fertility | Break / Weakness Punish | Super Break scaling & extra AV advance on break | March 7th (Hunt), Harmony MC |
Aligning your team's combat rotation with the stage Axiom ensures your squad retains high damage uptime without running out of Action Value.
Blighted to the Bone awards 1 Energy per DoT trigger, not 6 Energy as early community guides reported. The trade-off is a 40% All-Type RES ignore. Do not plan for infinite-energy loops; use it to cut through bloated boss defenses.
Unto Apotheosis works for traditional carries. Asta burning Skill Points quickly pushes the 60% CRIT DMG buff to max stacks, making up for budget relic stats.
Apocalyptic Shadow Difficulty 4 Team Comp: Budget Rosters
Building an apocalyptic shadow difficulty 4 team comp without limited banners requires strict role discipline. Neutral supports who cannot chip Toughness or match elements have no place here.
These two budget setups reliably clear 3,300+ points per side on standard runs:
Node 1: Break-Oriented Physical/Fire Core
- Main DPS / Sub-DPS: March 7th (Hunt) & Himeko
- Buffer / Speed Engine: Asta
- Sustain: Lynx
March 7th (Hunt) and Himeko rip through Fire and Physical Toughness bars. Asta supplies the team Speed needed to clear the 134 breakpoint while boosting Himeko's Fire output. Lynx cleanses crowd control and holds the line until the first break.
Node 2: Lightning DoT and Resistance Shred
- Damage Core: Serval
- Secondary Breaker: Dan Heng
- Support: Harmony Trailblazer
- Sustain: March 7th (Preservation) or Natasha
Serval handles multi-target Toughness chipping to wipe minions quickly. Dan Heng targets single-target Wind bars. March 7th (Preservation) provides unexpected utility: counter-attacks from her shields deal up to 60 Toughness damage to aggressive bosses like Ichor Memosprite on hit.
If you run low on trace materials or levels across two teams, buying Honkai Star Rail Stellar Jades helps replenish Trailblaze Power so you can finish traces and farm proper Speed relics before the cycle ends.
Apocalyptic Shadow Boss Rotation 2026: Tactical Phase Play
Boss encounters in the apocalyptic shadow boss rotation 2026 frequently hide boss health pools behind invulnerable minions or linked summons.
When a boss summons adds, its Toughness bar often locks behind a shield. Hitting the main body deals minimal damage and drains your AV. Target the perimeter first.
Stick to these phase rules:
- Kill Minions to Chip the Boss: Attacking summons strips Toughness directly from the main boss. Breaking or defeating adds removes damage reduction stacks.
- Hold Ultimates for the Break Window: Never waste an Ultimate to chip the last 5% of a Toughness bar. Finish the break with Basic Attacks or low-cost Skills, then drop all damaging Ultimates while the 100% damage taken debuff is up.
- Respect the Phase Shift: Moving into Phase 2 wipes all active debuffs and completely recharges the boss's Toughness. Do not queue high-cost bursts right before the transition. Let Phase 2 begin, clear the fresh wave of summons, and set up your burst again.
The Step-by-Step Apocalyptic Shadow Toughness Break Checklist
Keep your rotations tight by running through this apocalyptic shadow toughness break checklist on every attempt:
- Check Speed Breakpoints: Ensure all supports and sustains hit 134 Speed before starting.
- Use Offensive Techniques: Enter the fight with offensive Techniques to shave 20% to 30% off initial minion Toughness bars.
- Match Elemental Weaknesses: Run primary breakers that cover at least two active weakness types on the field.
- Wipe Summons Early: Clear adds immediately to drop the boss's shield and interrupt charge mechanics.
- Time the Break Hit: Use your sub-DPS or fastest support to land the break, triggering the dispel and AV advance for your carry.
- Unload Banked Ultimates: Fire all offensive Ultimates while the boss sits broken before Steadfast Safeguard reactivates.
Honkai Star Rail Apocalyptic Shadow Mistakes That Drain Your AV
Missed clears in Difficulty 4 typically trace back to avoidable tactical errors rather than a lack of five-star carries. Watch out for these common honkai star rail apocalyptic shadow mistakes:
- Attacking the Main Boss While Summons Live: Striking an invulnerable or shielded boss burns entire turns for zero return. Wipe tethered adds first.
- Over-Healing With Sustains: Lynx and Natasha do not need to heal every turn. The Weakness Break mechanic heals your party automatically. Save Skill Points for your breakers.
- Ignoring the Reset Schedule: Apocalyptic Shadow resets every six weeks on Monday at 04:00 server time. Building a squad on Sunday night leaves you with rushed relics. Plan builds earlier in the cycle.
- Splitting Break Elements: If an elite has Lightning and Fire weaknesses, focus attacks so one element consistently lands the break. Random attacks scatter Break effect scaling.
Building six to eight characters simultaneously strains free-to-play resources. If you need a boost before the reset closes, check out express supply pass and top up options to keep your account stocked with progression items.
FAQ
What total score is required to claim all Stellar Jades in Apocalyptic Shadow?
You need 6,600 cumulative points across standard two-node runs to claim the full 800 base Stellar Jades. If you tackle Starward Mode, you must score 10,200 points across three nodes to earn the additional 100 Stellar Jades.
Why does my team deal negligible damage to the boss at the start of battle?
Bosses feature an innate 50% damage reduction while their Toughness bar is intact. Once you cause a Weakness Break, that damage shield drops and the boss takes 100% increased damage.
Can I reuse strong supports like Tingyun across multiple nodes?
No, characters cannot be shared between nodes in the same run. You must allocate your roster into two distinct teams for standard Difficulty 4, or three distinct teams for Starward Mode.
How can I clear if I do not own premium limited archetypes?
Select generic Finality Axiom buffs such as Unto Apotheosis to boost basic hypercarries. Combine accessible units like Himeko, Serval, and Asta to match elemental weaknesses and clear summons rapidly.
Should I focus my attacks directly on the main boss or on summoned minions?
Focus on the summoned minions first in almost every encounter. Clearing minions removes damage mitigation from the main boss and directly drains the boss's Toughness bar.
What speed benchmark should budget supports aim for?
Target a minimum of 134 Speed on supports and debuffers. This benchmark guarantees an extra action within the initial Action Value bracket, ensuring you break shields before bosses unleash major attacks.
Final Verdict on Clearing Difficulty 4 Without Premium Units
Apocalyptic Shadow Difficulty 4 rewards clean execution over high Eidolons. You do not need limited units to clear; you need proper elemental coverage, correct Finality's Axiom pairing, and disciplined target focus.
Stop throwing unbuffed damage into unbroken bosses. Push supports to 134 Speed, clear summons to strip Steadfast Safeguard, and unload your burst inside the Break window. Treat the mode as a Toughness race, and reaching 6,600 points becomes routine.





Comments